
Alaska Central Railroad #1 is pictured here on the dock in Seattle in a promotional photo prior to shipment to Seward in April of 1904. The main rods have been removed to facilitate movement as a deck load onboard the Santa Anna of the Pacific Navigation Company. Portland Locomotive Co built the 4-4-0 builders number 499 in September of 1883 for Northern Pacific as their #784.As Alaska Central #1 she was sold in 1909 to the Alaska Northern and sold again in 1915 to the Alaska Engineering Commission to become #10. Retired in 1920 she was on the roster transfered to the Alaska Railroad in 1923 and finally scrapped in 1930.
This photograph motivated the kit bash of an HO scale version to fill the slot as the oldest locomotive represented in my model roster. An old AHM American still in it's tattered box came out of my junk drawer and I found the basic measurements acceptable.
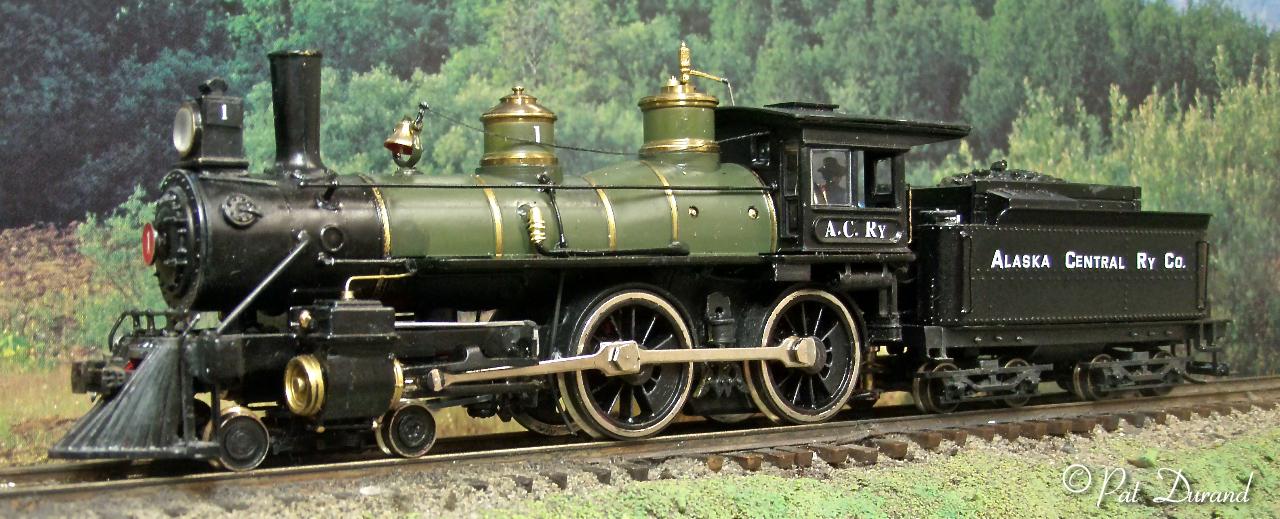
I find the resulting model a fair representation in my model roster.
Some of the major changes were tackled in the following order.
Shorten distance between tender and loco by 1 foot.
Cut the drive shaft in half, remove one foot
and rotate one end spline 90° and rejoin with surgical tube. Remove the
spring wire on the drawbar and discard. Drill a new hole for the tender drawbar
pin to engage. Make the new hole centered 1 foot from the original hole. Solder
a short piece of soft multi strand wire to the top of the rivet holding the
drawbar to the locomotive. Add a small eyelet to the other end of the wire
so the drawbar retaining screw for the tender will connect the wire solid
on the bottom of the tender drawbar pin and leave the drawbar to float freely
up and down the pin.
Reduce flanges on drivers and lead truck.
Now that the drive line is in two pieces add
a piece of surgical tube to one half and couple the tube to an appropriate
sized drill or shaft held in your power tool chuck. Set the locomotive on
a flat surface on top of some 200 grit emmory paper. With the mechanisim powered
by your power tool allow the drivers to spin on abrasive until the flanges
all consistently measure a scale 3 inches deep. The flanges will end up with
square edges that you then remove by holding a file against them while the
power tool turns the drivers. Round the edges of the flange to profile.
To reduce flanges on the lead truck wheels, pull the insulated wheel off the axle. The chuck the axle with the remaining wheel up and use your file to carefully remove flange material until the flange is about 2 inches deep. Insert a proper sized numbered drill into the insulated wheel and repeat the process.
You will find the locomotive tracks and runs better with the flanges reduced to more near scale size. Further improvements come with the drawbar able to float easily and the two ends of the drive shaft set at 90° to each other.
After installing the replacement Northwest Shortline wheel sets install all wheel electrical pickup. Use the original brass wipers on the axles for one side. Use modified Kadee coupler centering springs to make wipers and bracket to ride on the truck bolster and pick up power from the back side of the wheels on the insulated side.
I followed these suggestions to improve electrical pickup after reaming the
side frames and installing the Northwest Shortline wheel sets in the tender.
The article describes using modified Kadee centering springs for electrical
pickup.
http://www.pacificcoastairlinerr.com/bachmann_4-4-0/wipers/
She now runs like a dream and will pull far
more tonnage than her prototype did.
The original "can" motor responds well to DCC control and provides pleanty of power even with traction tires on the main drivers left side.
Extend the smoke box to approximate the photos with a piece of plastic tubing of appropriate diameter. Aim for a finished diameter of 56 inches to match the new smoke box front.
Add lead weight at every opportunity.
I lined the cab roof and sides below the windows.
I found 1/16 inch space over the factory weight under the wagon top boiler
shell, so I lined the shell down to an interfearance fit. Some small pieces
were added inside the smoke box but leave room for the headlight wires to
pass through. The largest addition of lead simulates an ash pan made from
three strips of lead glued to the the driver retaining cover between the drivers.
There is also room under the front pilot frame extension to add weight in
the recesses above the pilot truck.
Replace the stack.
A long 2-56 screw holds the boiler to the chassis
and terminates in the stack. Remove the screw and the stack. Drill and tap
2-56 into the base of the PSC replacement stack. After careful trial fitting
you can glue the stack to the smoke box using IC-2000 but avoid gluing the
screw.
Modify the cab.
Windows were trimmed out to match photos of
the prototype. The peaked cab roof was sanded at the peak and the edges to
an approximate radius to match photos. Then a new .010 styrene sheet was cut
to size and pre bent before it was glued to the old roof with mek at the edges
and peak.
Monochromatic photos give no clue as to the actual paint finishes. I chose to paint the locomotive in the same paint scheme specified by the Alaska Engineering Commission when they purchased their last narrow gauge locomotive for use out of Fairbanks.
Lots of work but great satisfaction in the finished project representing another locomotive claiming the No. 1 position in the roster of the Alaska Central, Alaska Northern, US, Alaska Railroad.
Parts List for converting AHM American to ACR #!
Cary
Cal Scale
Precision Scale Co.
Northwest Shortline
Kadee # scale head couplers.
Digitrax DZ 121 decoder
Evans Designs 1.8 mm Soft white LED with resistors and bridge rectifier