 |
 |
 |
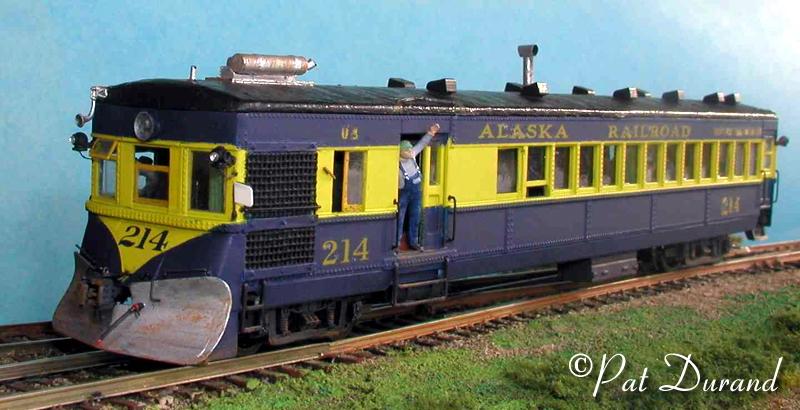
Alaska Railroad Diesel Electric #214
Motor Baggage Passenger Car Alaska Railroad #214 as rebuilt in 1948 was
photographed just North of the Palmer Depot along with trailer #303. The Koslosky's
Department and Grocery is in the background at the left while the COOP Garage
and Gas station is at the extreme right. As a child I would ride this conveyance
with my Mother to visit the extended Moffitt family in the Palmer area.
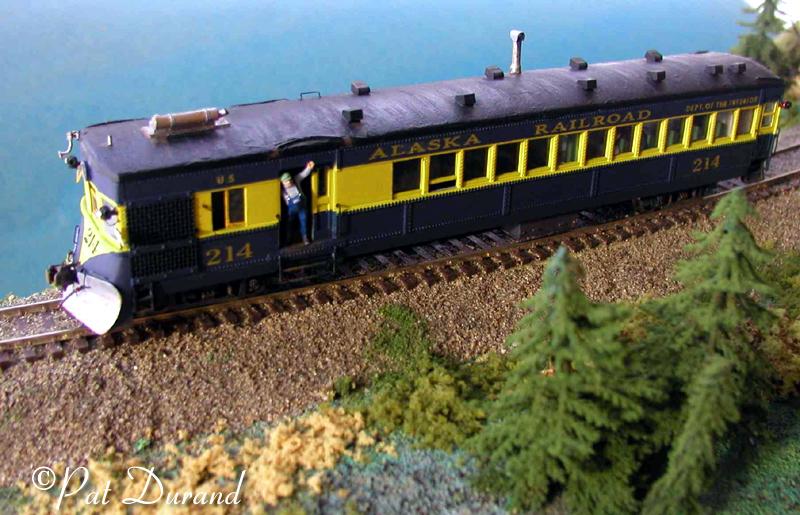
In 1927 Brill Gas Electric builders # 22539 was delivered new to the Alaska Railroad along with trailer #303 builders # 22540 . These were painted Pullman Green with Yellow/Gold lettering. The builders photo of #114 shows the right side layout. The Motor Baggage Passenger unit was 61 ft10 in length and had seating for 24. The trailer was 51ft 6 in long and seated 60 as built.
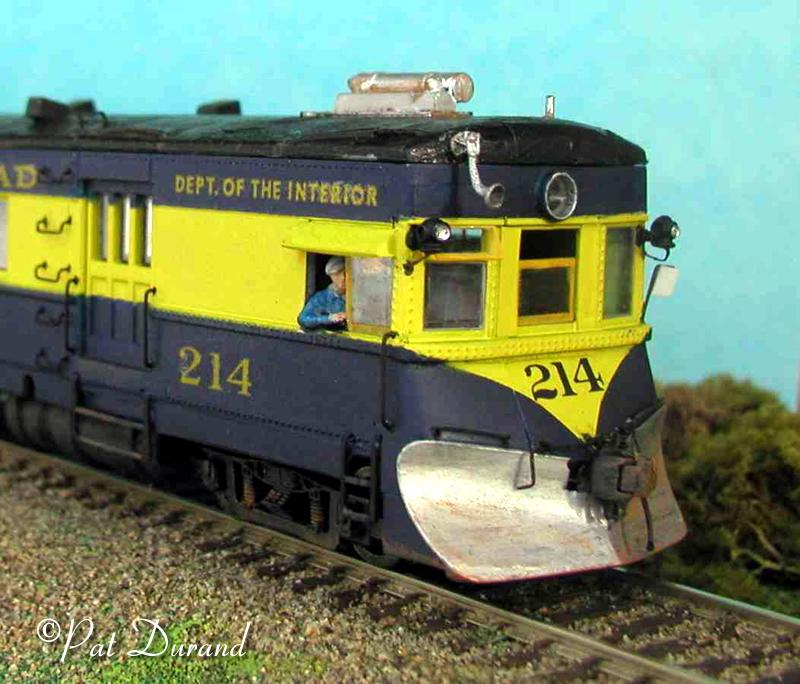
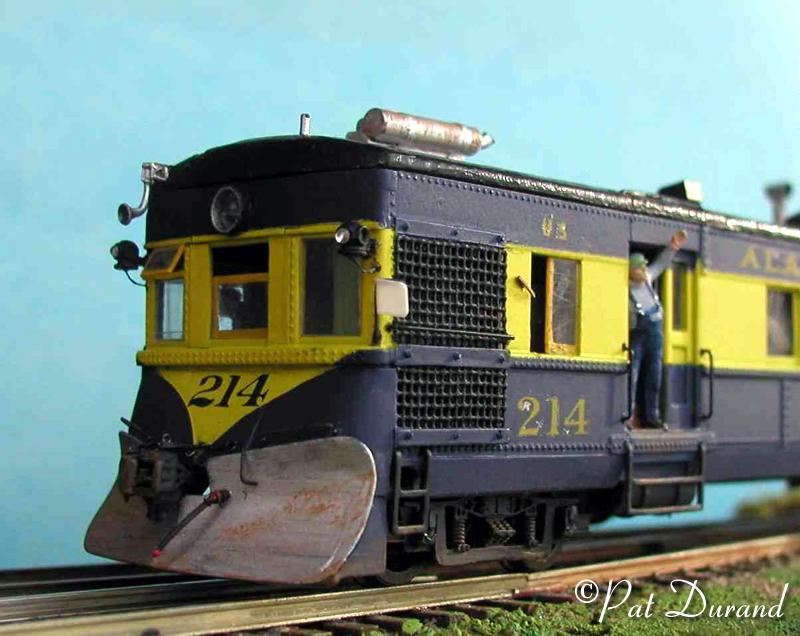
Rebuilt in May 1947 with extended skirts and shrouded snow plow, #114 was renumbered #214 and along with trailer # 303 received the new passenger Blue and Yellow paint with Yellow/Gold lettering. In 1949 she got a Cummins Diesel power plant.
Retired in April 1954 #214 spent some time in the Birchwood bone yard. Eventually her body came to rest next to the body of #212 in an open field near the old Seward Highway. The property was eventually developed in the early 1960s after major ice lenses were melted out. Today the site is occupied by the Boarders Book Store at the major intersection of the Old Seward Highway and Diamond Blvd.
Bob Barrett of Sterling, Alaska, made HO scale drawings of these cars based on photos and measurements he took in the early 1960s. The model #214 is based on these drawings, photos and the Bachmann EMC Gas Electric in HO scale.
|
|
|
ARR #214 Model Construction
by Pat Durand.
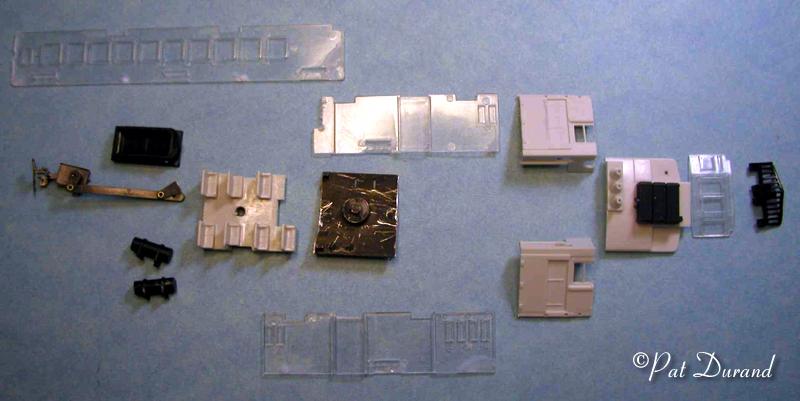
Modification of the Spectrum Bachmann Gas Electric (DOODLEBUGS) item # 81401
into the Alaska Railroad #214 circa 1948 is a very straight forward project.
Have a sharp zona saw and #11 blades as well as sharp flat files to finish plastic
cuts. The left over parts were photographed
to help you visualize where some of the cuts were made and the white styrene
parts are obvious additions.
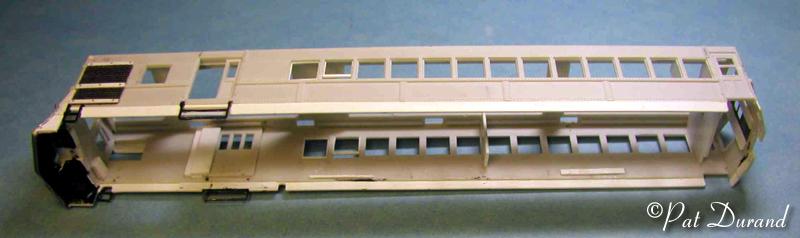
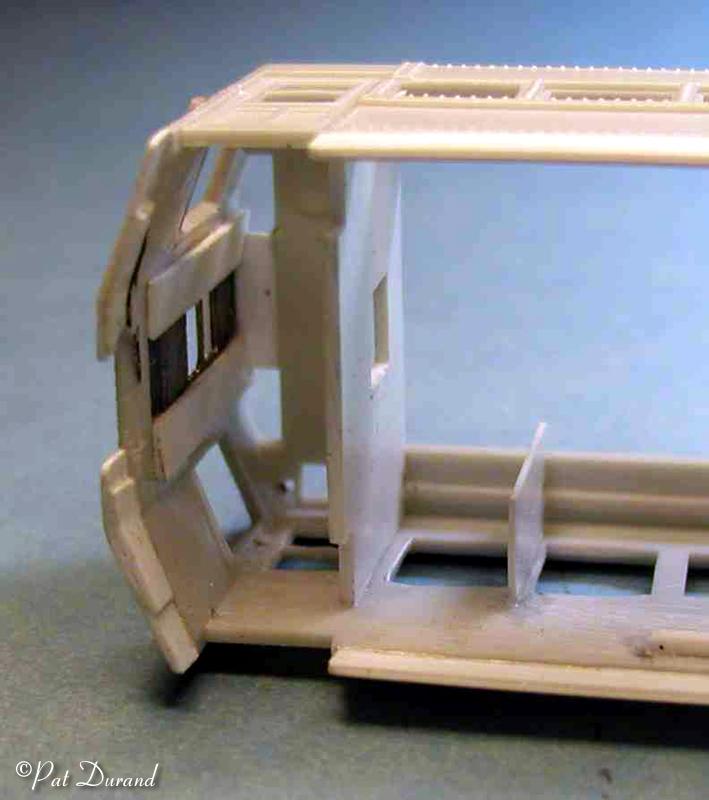
Start by removing the roof and cutting off the forward 9 feet including the radiator and engine detail. Fill the end section of the roof with styrene blocks and then shape to match the photos. Remove the roof vents and the apply formed wire drip strips per the photos. The canvas roof is four foot wide strips of tissue paper applied with cheap black enamel. I removed the two foremost attachment lugs from the bottom of the roof since they no longer line up and are not needed. Harriman roof vents are added to match photo locations. The exhaust system is a large cylinder muffler with a rear facing stack, this is mounted off center on a steel support pad larger than the muffler. I used .040" styrene with 5 carriage bolt heads visible down each long edge and centered the plate on the roof per photos.
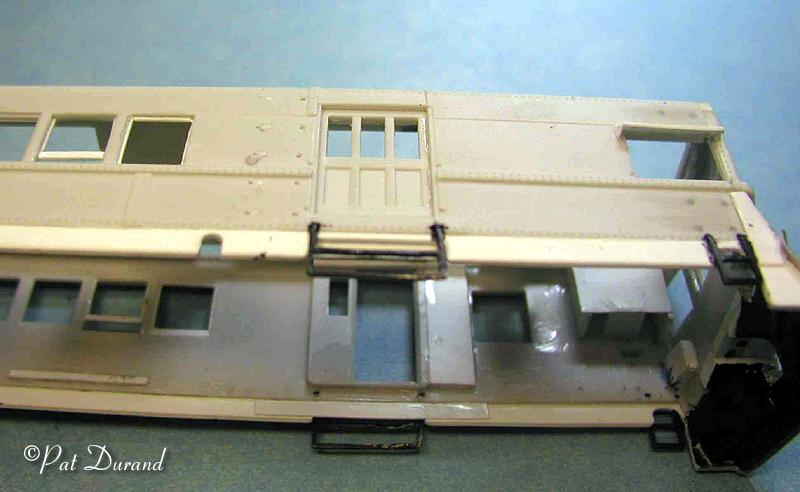
Section the body shell in three cuts. First remove the front face behind the rivet detail at the corners. Next remove 8 scale feet from the side sheets and cross bracing from the first cut back toward the baggage doors. Next remove 1 scale foot from the baggage door section to create a three panel door where there was originally a four panel door. If you want open doors now is the time to just remove the required number of panels. Set the body on a level work surface and dry fit the the three remaining sections including the front wall, filing as necessary to ensure square fits. Now you can put the body back together and it will be 9 scale feet shorter to match the roof. I used .04 styrene pieces to reinforce the front corners and .02 on the side joints, being careful not to create interference with the floor.
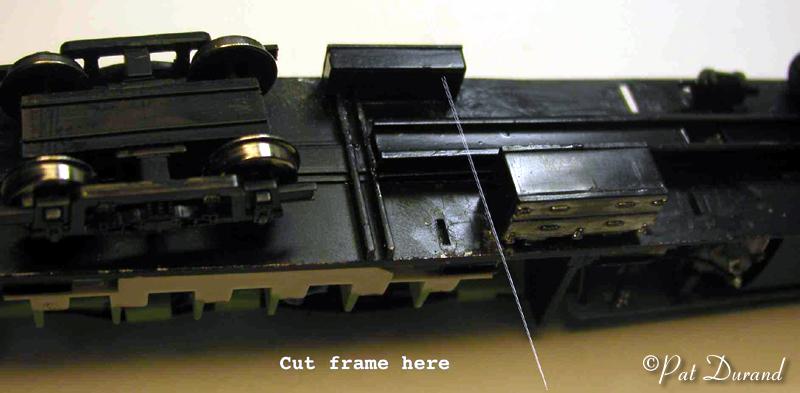
The Chassis needs to be shortened by 9 scale feet. Start by removing the boxes and tanks from the bottom of the frame. Set them aside for use later. Cut across the frame about 4 scale feet behind the baggage room wall and take out 9 feet toward the rear. I also removed 9 feet from the clear plastic ceiling mounting plate and an appropriate number of seats. I used JB Kwik to attach a scrap of 16 gauge sheet metal on the floor to bridge the joint and reinforce the chassis. On the bottom I added two pieces of heavy styrene 12" channel to create a center beam and add rigidity to the chassis. Relocate the tanks and boxes to match the photos.
You will not be using the stock window inserts except for the vestibule doors and the baggage doors. The body and chassis become a friction fit adjustable by filing off the front corners of the chassis casting if necessary. Comparing the photos to the model you can add the extra windows in the baggage area, rear vestibule wall and enlarge the last window on each side. If you use a strip of masking tape to delineate the top of the windows then you can use a pencil and straight edge to draw the vertical lines as limits at the sides of the windows. All these openings will terminate at the belt line and later you can use .02 styrene strips to add the window mullions and sash. While at it open a few of them. Drill holes about .03 in from the corners of each window to be opened. Then enlarge the hole and gang drill around until the center can be pushed out. Then finish with sharp #11 blades to square the sides and touch with a flat file.
Many appliances and grab irons need to be added to the body eventually. Now is the time to lay these out and drill pilot holes all the way through. Taking this step now avoids possible damage to the finished painted surfaces if you try and lay these out after paint is applied. After everything is painted then you will be able chase these holes out and install the grabs, steps, marker lamps etc. The single chime air horns need to be brass so you can bend the trumpet 90 degrees to match the prototype.
The original baggage door steps are made from brass but are too long. Section the two rungs by removing a scale foot. If you are careful you need only cut out a scale 6" and then file a taper on opposite sides of the remaining rungs, tin them and solder them back together. They will clean up with a file and fit just fine. Disregard all the factory grab irons, and make new ones from .010" wire. Install these after the final paint but before dull coating. They were all painted black along with the steps.
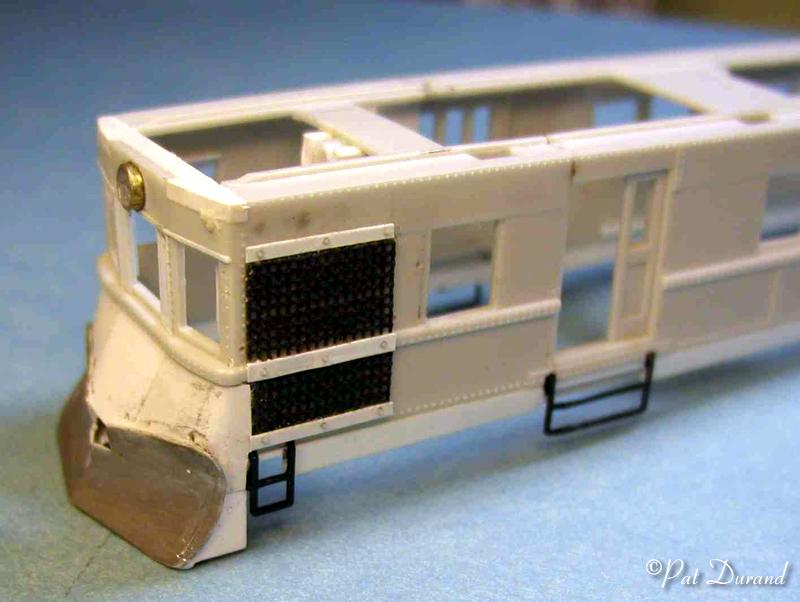
The blower housing occupied the left side of the cab. A large squirrel cage blower sat on the floor of the cab and pulled cold air in the bottom of the grill and up through the radiators to discharge out the top grill. Looking in the front window of the cab you can see the wood housing that enclosed the unit. I used a piece of woven dry wall abrasive to make the heavy woven wire grill work.
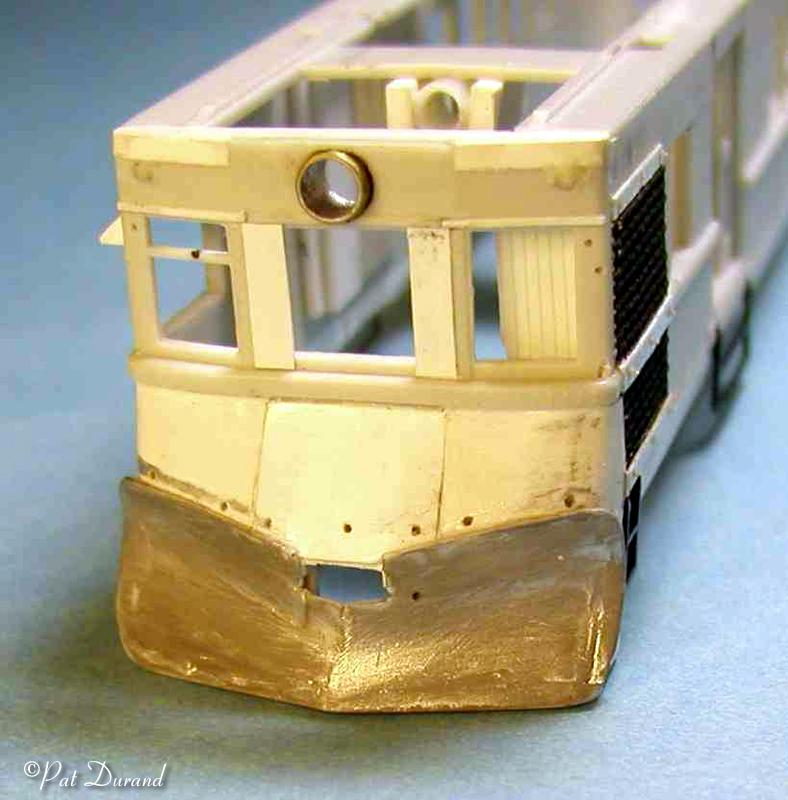
The skirt is a 12" wide strip of .04 styrene glued flush with the bottom edge of the body shell. I used Tenex cement for all the styrene joinery and made a second application after about an hour on joints that would be subject to stress.
The headlight is a piece of aluminum or brass tube inserted through the end of the roof. The plow was built from styrene using the plow template described in modeling tips. The frame behind it is extended out with .040" styrene. Once the plow is applied the contour up to the belt line was formed by repeatedly trial fitting a piece of .010" styrene sheet to form the center panel. Once it was cured the two side panels were rolled and fitted just as the prototype job was done. The front coupler is a fifty year old sterling silver fully operational scale coupler from my junk box.
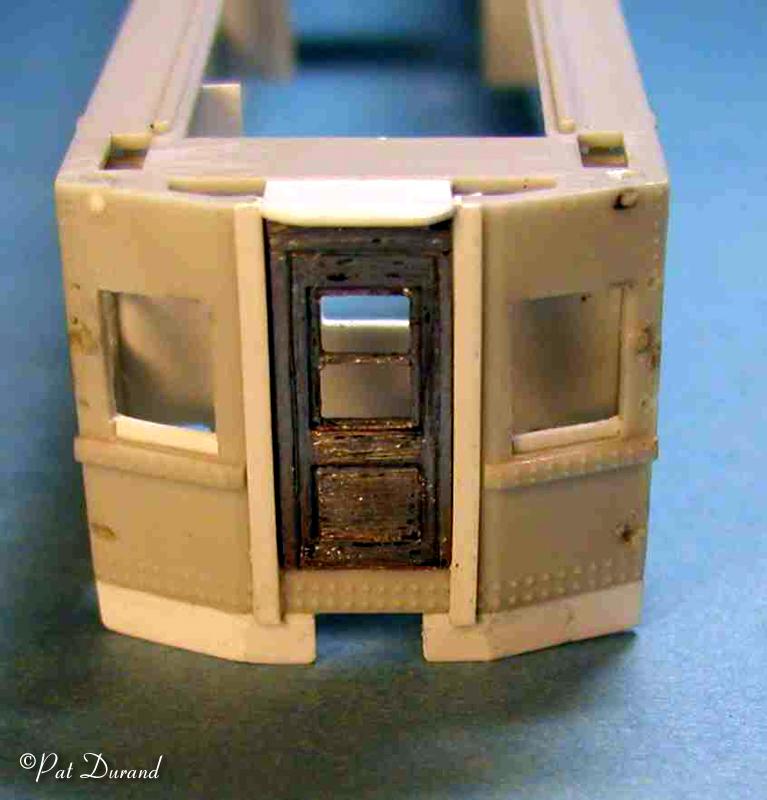
At the rear vestibule, discard the soft plastic diaphragm and door. I found a coach door in my junk box and added the windows. Styrene braces were added behind the door and a new .040" inner vestibule wall were added to reinforce this vulnerable section of the body. A body mounted #58 Kadee was added at the rear after removing the original centering device.
Masking for painting is a little tricky because of the heavy rivet detail on the belt rail. I reversed the normal process by painting the blue first. (B&O Royal Blue and Reefer yellow since this is new paint). After an overnight cure I masked along the surface of the belt line with my paper and Scotch Magic Mending tape technique. Then a light gray primer was shot on the area to be painted yellow. By holding the gun at 90 degrees to the masked edge and holding back more than a foot from the surface, I avoided paint over spray from going under the mask. After 30 minutes, I shot the yellow paint the same way. The masking was removed after 15 minutes and there was only a little yellow over spray in the corners of the doors. The blue is easy to touch up with a brush where as yellow is near impossible to apply over a darker color. On the window sills there may be a little of the blue still showing through the yellow. That’s just fine because these doodlebugs sat right next to steam engines and I'll just bet that the sills were covered with ash and cinders.
After paint is cured and decals applied it’s time to add all the grab irons and fine details. Just chase out the earlier drilled pilot holes, insert the parts using small amounts of ACC. Paint all the grabs black, touch up any blue or yellow and then a finish dull coat or semi gloss is appropriate prior to window installation. I used clear .02 plastic cut from a piece of packaging, to create the windows. I cut strips and finished them as slight friction fits in the openings. Before final cutting from the strip, I used a small set of dividers to scribe the edge a scale 3 inches in to create a mullion. Then I finish cut the window and painted the edge up to the scribe line with yellow. The paint will follow the scribe line and if you get a mess just wash it off and start over. Let the painted mullion dry and then fix the window in the opening with Super Crystal Clear. If you want really clean windows use a paint brush and float a coat of FUTURE floor wax over the surface front and back. I prefer the dirty window look.
The finished model has an excellent power assembly equipped with DCC and is making regular trips on the Alaska Central Railroad at the Northern lights Model Railroad Club. A convincing trailer could be made by kit bashing the passenger ends from two of the Bachmann gas electrics. This has been a fun project that captures a little known part of the ARR history that I had experienced as a seven year old child.
Materials List3 ea. Drain Cock #C-160 Custom Finishes by Bob Rzasa
1 pkg. Grab Irons 17" Drop SY 2202 Detail Associates
1 Coupler Lift Bar SY 2205
1 pkg. Roof Vent Harriman 6604
1 set Marker Lamps MA-260 Cal Scale/Bowser
1 set UC Air Brake AB-300
1 pr. Nathan KS1 Single Horn 190-422
1 set Red Lenses LS 301 M.V. Products
1 Set Clear Lenses LS 300
1 pr. Couplers Scale #58 Kadee
Approx. 12" .010" wire for grab irons
Brass tube for stove pipe and cap
Styrene Sheet material .010" .020" .040"
Brass tube for Exhaust pipe.