 |
 |
|
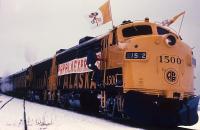
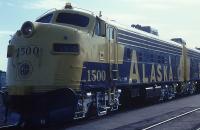
| Here are two photos that are an example of my explanation. Both are of #1500. The winter view (left) is underexposed. The summer view (right) overexposed. | ||
4/5/11 update on paint matching cir 2000 to 2011 ARR Passenger Equipment.
Matching the paint on HO scale RTR diesels and ARR passenger equipment can be a challenge. Recent projects required a visit once again to the question, "What are the correct colors for Alaska Railroad passenger equipment?"
Prior to arrival of the Korean built passenger equipment in the 80s and arrival of the Mac 70's there were several faded blue and yellow schemes and they have been subjects of earlier discussions here.
When Walthers came out with the Riverossi ARR passenger set they got the color right for passenger consists and power that came into service in the 90's up to the present.
I have adopted the following standard colors by Polly Scale
Caution Scalecoat paints with the same name are different colors.
ARR 2000 Passenger Yellow is Polly Scale CSX Yellow
ARR 2000 Passenger Blue is Polly Scale CSX Blue 7 parts to B&O Enchantment Blue 1 part.
Part 1
Steam engines and diesels that have been in service for more than three years since last paint job:
First generation diesel locomotives in blue and yellow
were subject to severe weathering. Mix the paint for each locomotive
and test it first.
1980 and 1990's diesels. Same blue and yellow
tuned up for cleaner paint jobs. You may also experiment with CSX
Blue 414221 as it may better meet your perception of the proper color under
artificial light.
MOW Box cars SP Lettering Gray 414179 and other similar gray shades. These cars also chalked up and got lighter with time.
Reefer cars were usually Reefer Yellow 414122
Box Cars Troop Sleeper conversions are approximated with Mineral Red 414350 and Box Car Red 414281.
Wayside structures are Reading Green 414376 with white trim Prior to 1946 and restored buildings.
Sand 414302 with Box Car Red trim starting after 1946 until present.
For weathering and detailing - Rust 410073, Grimy Black, Oily Black variously applied with water, alcohol or POLYS thinner depending on the effect desired.
I do not paint out of the bottle unless it is already scrap paint, in which it is used just for brush painting details etc. I stir each bottle completely and pour out what may be needed into a clear plastic 35mm film canister with a snap tite lid. Paint mixing is done in the canister, to taste. If paint is to be airbrushed thin it with at least 20% PollyS Thinner in the canister. Paint can be stored in the canister for up to three months, and probably longer. Mark the car number or project name on the lid. It is easy to pour from the canister into your air brush paint pot. You will find on big jobs that the AZTEC bottle syphon cap will press fit right into the canister when it is used as a large paint pot.
Never add PollyS thinner to the new bottle of PollyS paint as it will affect long time storage. By using the canisters in this manner, the original paint bottle is kept fresh and uncontaminated and the cap does not end up painted on the bottle.
When spray painting, always use a paint booth with
a strong fan that will pull the paint away from your lungs.
Each time you fire up the air brush the unseen overspray may seem insignificant.
Just as a test, wear a simple particle mask the next time you spray, and
then notice what you are breathing in as about 50% of it will be caught
by the mask and the rest is now in your lungs. Even with these precautions
I still opt for water based paints. All I need to do is capture the
particulate, not the chemical fumes from other products.
Part 2
Matching model paint to prototype photos and real equipment in the field is not science but rather the best attempt at art. You will find the color shift in photography to be very deceiving, add to that scanning, monitors and printers and several generations later you may as well be on the end of a gossip line. Many photographers use blue filters which alter the true representation.
 |
 |
|
| Here are two photos that are an example of my explanation. Both are of #1500. The winter view (left) is underexposed. The summer view (right) overexposed. | ||
As a tool to achieve believable color matches for the array of blues and yellows used on the Alaska Railroad over the years, I painted a color sample on an excess RS1 shell. These were done without benefit of base coat primer and were brush painted but still show the variations.
The color names and numbers relate to PolyS paint. I do not use the ATSF blue, it is there as a demonstration only.
To match the prototype in the field, I hold the shell at arms length at least 30 ft from the real thing with the sun at my back. Which hue is closest? Does the value, light to dark, match or do you need to make it lighter by adding SP Lettering gray? Now add the fudge factor that the model will be viewed under artificial light and arbitrarily make the model lighter. You can only hope to come close and get the feel of the prototype. Mother nature helps us out because sunlight and weather and time will make your paint color selection come close some time during the life of the prototype.
Yellow is very tough, because you are stuck with the decals obtainable. Some time you need to add a second layer of decal to achieve the color needed. Best to paint a light gray undercoat prior to adding thin coats of final yellow. In general I find Railbox Yellow and various amounts of SP lettering gray added, usually do the job for locomotives.
If you have had good results with other colors and paints
please let me know. Thanks in advance.
Pat Durand

Part 3
My best suggestions for duplicating locomotive paints for Alaska Railroad are:
Use light gray primer. If painting a yellow stripe
use Railbox yellow and put it on next. After yellow has cured for
24 hours apply masking with scotch magic mending tape and paper strips.
Expose only about 1/8 inch of the tape beyond the edge of a piece of paper.
By holding the paper you can then trim the tape with sharp scissors to
go around obstructions, curves etc. The tape can then be embossed around
rivets and sharp edges. When it comes time to remove masking,
about 20 minutes after painting, pull on the paper and the tape comes off
easily while still attached to the paper strip. Using this process
eliminates
tool marks trying to remove the masking, and prevents
the tape adhesive from attacking the base color paint. The new paint
edge then has a chance to heal into the base paint without leaving a raised
edge which will occur if you let the paint cure against the masking tape.
GTW cut with SP lettering gray for first generation diesels (F7, Baldwin VO1000, SW1, all Alco units) weathered with dullcoat.
CSX Blue cut with SP lettering gray for 80's and 90's (GP 38, 49, 40-2, EMD F7, E8/9) when weathered with dulcoat. CSX uncut as fresh paint with light gloss.
B&O over light gray primer starting with year 2000 repaints and MAC70's.. Light gloss coat for new paint.
As soon as the railroad starts cutting back on maintenance
expect a need to dullcoat after 2 years.